網頁

2018年12月7日 星期五

EAST Tesseract 效能測試

EAST: An Efficient and Accurate Scene Text Detector

參考 OpenCV OCR and text recognition with Tesseract

發現 opencv 使用硬體加速是
net = cv2.dnn.readNet(args["east"])
net.setPreferableTarget(cv2.dnn.DNN_TARGET_OPENCL);
而 OPENCL 並不是 NVDIA 的 CUDA 是 Intel(GPU)

使用了 tensorflow 的 gpu(CUDA)
效能的卻比較好
640x480 從 400ms 到 340ms

但 Tsseract 沒有加速,只能加速 EAST

build tensorflow 1.10

參考 build tensorflow 1.11 from source in visual studio

(base) D:\TensorFlowB>conda env list
(base) D:\TensorFlowB>conda env remove -n tensorflow-1.10
(base) D:\TensorFlowB>conda create -n tensorflow-1.10 pip python=3.6
(base) D:\TensorFlowB>activate tensorflow-1.10
(tensorflow-1.10) D:\TensorFlowB>pip install six numpy wheel protobuf absl-py
(tensorflow-1.10) D:\TensorFlowB>pip install keras_applications==1.0.5 --no-deps
(tensorflow-1.10) D:\TensorFlowB>pip install keras_preprocessing==1.0.3 --no-deps

D:\TensorFlowB>git clone https://github.com/tensorflow/tensorflow.git tensorflow-1.10
D:\TensorFlowB>cd tensorflow-1.10
D:\TensorFlowB\tensorflow-1.10>git checkout r1.10
D:\TensorFlowB\tensorflow-1.10>git pull origin master
D:\TensorFlowB\tensorflow-1.10>bazel clean
D:\TensorFlowB\tensorflow-1.10>python ./configure.py

修改 D:/TensorFlowB/tensorflow-1.10/tensorflow/contrib/cmake/CMakeLists.txt

if (tensorflow_OPTIMIZE_FOR_NATIVE_ARCH)
  include(CheckCXXCompilerFlag)
  CHECK_CXX_COMPILER_FLAG("-march=native" COMPILER_OPT_ARCH_NATIVE_SUPPORTED)
  if (COMPILER_OPT_ARCH_NATIVE_SUPPORTED)
    set(CMAKE_CXX_FLAGS "${CMAKE_CXX_FLAGS} -march=native")
  else()
    CHECK_CXX_COMPILER_FLAG("/arch:AVX2" COMPILER_OPT_ARCH_AVX_SUPPORTED)
    if(COMPILER_OPT_ARCH_AVX_SUPPORTED)
      set(CMAKE_CXX_FLAGS "${CMAKE_CXX_FLAGS} /arch:AVX2")
      add_definitions(-D__AVX2__)
    endif()
  endif()
endif()

D:/TensorFlowB/tensorflow-1.10/tensorflow/contrib/cmake
選 Visual Studio 14 2015 Win64
Optional toolset to use, 輸入 "host=x64"
tensorflow_BUILD_SHARED_LIB v
tensorflow_ENABLE_GPU v

問題與解答
D:\TensorFlowB\tensorflow-1.10\tensorflow\stream_executor\dnn.pb.h
This file was generated by a newer version of protoc
which is incompatible with your Protocol Buffer headers.
Please update your headers.

D:\TensorFlowB\tensorflow-1.10\tensorflow\contrib\cmake\external\protobuf.cmake
set(PROTOBUF_TAG v3.6.0)
set(PROTOBUF_TAG v3.6.1)

D:\TensorFlowB\tensorflow-1.10\tensorflow\workspace.bzl

  tf_http_archive(
      name = "protobuf_archive",
      urls = [
          "https://mirror.bazel.build/github.com/google/protobuf/archive/v3.6.1.tar.gz",
          "https://github.com/google/protobuf/archive/v3.6.1.tar.gz",
      ],
      sha256 = "3d4e589d81b2006ca603c1ab712c9715a76227293032d05b26fca603f90b3f5b",
      strip_prefix = "protobuf-3.6.1",
  )
  tf_http_archive(
      name = "eigen_archive",
      urls = [
          "https://mirror.bazel.build/bitbucket.org/eigen/eigen/get/fd6845384b86.tar.gz",
          "https://bitbucket.org/eigen/eigen/get/fd6845384b86.tar.gz",
      ],
      sha256 = "d956415d784fa4e42b6a2a45c32556d6aec9d0a3d8ef48baee2522ab762556a9",
      strip_prefix = "eigen-eigen-fd6845384b86",
      build_file = clean_dep("//third_party:eigen.BUILD"),
      patch_file = clean_dep("//third_party:eigen_half.patch"),
  )

download eigen_half.patch to D:\TensorFlowB\tensorflow-1.10\third_party\eigen_half.patch

build project tf_python_build_pip_package 產生
EXEC : error : [WinError 5] 存取被拒。:
'build\\bdist.win-amd64\\wheel\\tensorflow_gpu-1.10.1.data\\purelib\\tensorflow\\include\\tensorflow\\stream_executor\\dnn.pb.h'
改變 dnn.pb.h 檔案屬性
使用 Administrator 開啟 vs2015 x64 Native Tools Command Prompt
D:\TensorFlowB\build-1.10>D:\Anaconda3\envs\tensorflow-1.10\python.exe D:/TensorFlowB/build-1.10/tf_python/setup.py bdist_wheel --project_name tensorflow_gpu
另外開啟 Anaconda
(base) D:\TensorFlowB\build-1.10\tf_python>activate tensorflow-1.10
(tensorflow-1.10) D:\TensorFlowB\build-1.10\tf_python>pip install dist\tensorflow_gpu-1.10.1-cp36-cp36m-win_amd64.whl

bazel build --config=opt --config=cuda //tensorflow/tools/pip_package:build_pip_package
失敗,沒有到解決方法
c:\users\mark\appdata\local\temp\nvcc_inter_files_tmp_dir\depthwise_conv_op_gpu.cu.compute_70.cudafe1.stub.c(3):
fatal error C1083: Cannot open include file: 'depthwise_conv_op_gpu.cu.fatbin.c': No such file or directory

2018年11月28日 星期三

build tensorflow 1.11 from source in visual studio

先說重點
目前 windows 下 GPU 的版本來到 tensorflow_gpu-1.12.0 使用 Bazel
但是發現目前的 Bazel 產生的 library 不能在 Visual Studio 中使用
退到 tensorflow_gpu-1.11 使用 Cmake 建立 library

另外只能建立 Release 版本,並使用 RelWithDebInfo 版本,取代 Debug 版本
但只有 Release 能成功

library 建立起來後,程式可以編譯,可以執行,但結果是錯的

開啟 Anaconda Prompt
(base) D:\>conda create -n tensorflow-1.11 pip python=3.6
(base) D:\>activate tensorflow-1.11
(tensorflow-1.11) D:\>pip install six numpy wheel
(tensorflow-1.11) D:\>pip install keras_applications==1.0.5 --no-deps
(tensorflow-1.11) D:\>pip install keras_preprocessing==1.0.3 --no-deps

http://www.msys2.org/
下載 msys2-x86_64-20180531.exe
開啟 msys2/MinGW 64-bit
$ pacman -Syu
$ pacman -Su
$ pacman -S git patch unzip

安裝 Bazel
https://github.com/bazelbuild/bazel/releases
下載 bazel-0.18.1-windows-x86_64.exe
rename bazel-0.18.1-windows-x86_64.exe bazel.exe
move bazel.exe D:\msys64\usr\bin
add PATH D:\msys64\usr\bin

安裝 JDK 8
下載 jdk-8u191-windows-x64.exe
add JAVA_HOME C:\Program Files\Java\jdk1.8.0_191

copy cudnn-9.0-windows10-x64-v7\cuda\* to
C:\Program Files\NVIDIA GPU Computing Toolkit\CUDA\v9.0

下載 swigwin-3.0.12.zip
解壓縮於 D:\TensorFlowB\swigwin-3.0.12

開啟 VS3215 x64 Native Tools Command Prompt
D:\TensorFlowB>git clone https://github.com/tensorflow/tensorflow.git tensorflow-1.11
D:\TensorFlowB>cd tensorflow-1.11
D:\TensorFlowB\tensorflow-1.11>git checkout r1.11
D:\TensorFlowB\tensorflow-1.11>python ./configure.py
Please specify the location of python. [Default is D:\Anaconda3\python.exe]:
Please input the desired Python library path to use.  Default is [D:\Anaconda3\lib\site-packages]
Do you wish to build TensorFlow with nGraph support? [y/N]:
Do you wish to build TensorFlow with CUDA support? [y/N]: y
Please specify the CUDA SDK version you want to use. [Leave empty to default to CUDA 9.0]:
Please specify the location where CUDA 9.0 toolkit is installed. Refer to README.md for more details. [Default is C:/Program Files/NVIDIA GPU Computing Toolkit/CUDA/v9.0]:
Please specify the cuDNN version you want to use. [Leave empty to default to cuDNN 7.0]:
Please specify the location where cuDNN 7 library is installed. Refer to README.md for more details. [Default is C:/Program Files/NVIDIA GPU Computing Toolkit/CUDA/v9.0]:
Please note that each additional compute capability significantly increases your build time and binary size. [Default is: 3.5,7.0]:
Please specify optimization flags to use during compilation when bazel option "--config=opt" is specified [Default is /arch:AVX]: /arch:AVX2
Would you like to override eigen strong inline for some C++ compilation to reduce the compilation time? [Y/n]:

修改 D:/TensorFlowB/tensorflow-1.11/tensorflow/contrib/cmake/CMakeLists.txt 增加 AVX2 功能

if (tensorflow_OPTIMIZE_FOR_NATIVE_ARCH)
  include(CheckCXXCompilerFlag)
  CHECK_CXX_COMPILER_FLAG("-march=native" COMPILER_OPT_ARCH_NATIVE_SUPPORTED)
  if (COMPILER_OPT_ARCH_NATIVE_SUPPORTED)
    set(CMAKE_CXX_FLAGS "${CMAKE_CXX_FLAGS} -march=native")
  else()
    CHECK_CXX_COMPILER_FLAG("/arch:AVX2" COMPILER_OPT_ARCH_AVX_SUPPORTED)
    if(COMPILER_OPT_ARCH_AVX_SUPPORTED)
      set(CMAKE_CXX_FLAGS "${CMAKE_CXX_FLAGS} /arch:AVX2")
      add_definitions(-D__AVX2__)
    endif()
  endif()
endif()

參考 Add abseil_cpp cmake dependence. 修改
D:/TensorFlowB/tensorflow-1.11/tensorflow/contrib/cmake/CMakeLists.txt
增加 tensorflow/contrib/cmake/external/abseil_cpp.cmake
增加 tensorflow/contrib/cmake/modules/FindAbseilCpp.cmake
以免出現找不到 absl/strings/string_view.h 錯誤

    add_definitions(-DGOOGLE_CUDA=1 -DTF_EXTRA_CUDA_CAPABILITIES=3.5,3.7,5.2,6.0,6.1,7.0)


修改 D:\TensorFlowB\tensorflow-1.11\tensorflow\contrib\cmake\external\eigen.cmake
option(eigen_PATCH_FILE "Patch file to apply to eigen" OFF)
set(eigen_PATCH_FILE "D:/TensorFlowB/eigen_half.patch")
修改 D:\TensorFlowB\tensorflow-1.11\bazel-tensorflow\tensorflow\workspace.bzl

  tf_http_archive(
      name = "eigen_archive",
      build_file = clean_dep("//third_party:eigen.BUILD"),
      patch_file = clean_dep("//third_party:eigen_half.patch"),
  )

下載 https://github.com/amsokol/tensorflow-windows-build-tutorial/blob/master/eigen_half.patch
置於 D:/TensorFlowB/eigen_half.patch
之後會修改
D:\TensorFlowB\build-1.11\eigen\src\eigen\Eigen\src\Core\arch\CUDA\Half.h
D:\TensorFlowB\build-1.11\external\eigen_archive\Eigen\src\Core\arch\CUDA\Half.h
避免下列錯誤

Error  more than one instance of overloaded function "__hadd" matches the argument list: tf_core_gpu_kernels d:\tensorflowb\build-1.11\external\eigen_archive\eigen\src\Core\arch\CUDA\Half.h 212 

CMake
source: D:/TensorFlowB/tensorflow-1.11/tensorflow/contrib/cmake
build: D:/TensorFlowB/build-1.11
Configure
Visual Studio 14 2015 Win64
Optional toolset: host=x64
SWIG_EXECUTABLE=D:/TensorFlowB/swigwin-3.0.12/swig.exe
tensorflow_BUILD_SHARED_LIB=v
tensorflow_ENABLE_GPU=v
eigen_PATCH_FILE=v

cmake 使用 message() debug

以 Administrator 開啟 Visual Studio 2015
開啟 D:\TensorFlowB\build-1.11\tensorflow.sln
換成 Release 版本
開啟下列專案的屬性設定
_beam_search_ops, _gru_ops, _lstm_ops, _nearest_neighbor_ops, _periodic_resample_op
Property Pages/Configuration Properties/Linker/Input/Additional Dependencies
\pywrap_tensorflow_internal.lib 改為 Release\pywrap_tensorflow_internal.lib

出現 cuda_kernel_helper.h 找不到 cuda_fp16.h

Severity Code Description Project File Line Suppression State
Error C1083 Cannot open include file: 'cuda/include/cuda_fp16.h': No such file or directory _beam_search_ops D:\TensorFlowB\tensorflow-1.11\tensorflow\core\util\cuda_kernel_helper.h 24 

開啟 D:\TensorFlowB\tensorflow-1.11\tensorflow\core\util\cuda_kernel_helper.h
//#include "cuda/include/cuda_fp16.h"
#include "cuda_fp16.h"

出現錯誤

Severity Code Description Project File Line Suppression State
Error LNK2019 unresolved external symbol "class absl::uint128 __cdecl absl::operator%(class absl::uint128,class absl::uint128)" (??Labsl@@YA?AVuint128@0@V10@0@Z) referenced in function "private: void __cdecl absl::str_format_internal::`anonymous namespace'::ConvertedIntInfo::UnsignedToStringRight(class absl::uint128,struct absl::str_format_internal::ConversionChar)" (??$UnsignedToStringRight@Vuint128@absl@@@ConvertedIntInfo@?A0x0d227ec7@str_format_internal@absl@@AEAAXVuint128@3@UConversionChar@23@@Z) tf_tutorials_example_trainer D:\TensorFlowB\build-1.11\arg.obj 1 

Linker/Input/Additional Dependencies 加入
abseil_cpp\src\abseil_cpp_build\absl\numeric\Release\absl_int128.lib

最後是 estimator_python_api 和 tf_python_api 失敗
需要開啟 VS2015 的 Tools/Options/Projects and Solutions/Build and Run
MSBuild project build output verbosity: Normal 才能看到訊息

修改 D:\TensorFlowB\build-1.11\tf_python_api.vcxproj

from "C:\Program Files\CMake\bin\cmake.exe" -E env PYTHONPATH=D:/TensorFlowB/build-1.11/tf_python "" D:/Anaconda3/python.exe D:/TensorFlowB/build-1.11/tf_python/tensorflow/python/tools/api/generator/create_python_api.py --root_init_template=D:/TensorFlowB/build-1.11/tf_python/tensorflow/api_template.__init__.py --apidir=D:/TensorFlowB/build-1.11/tf_python/tensorflow --package=tensorflow.python --apiname=tensorflow D:/TensorFlowB/tensorflow-1.11/api_init_files_list.txt
to "C:\Program Files\CMake\bin\cmake.exe" -E env PYTHONPATH=D:/TensorFlowB/build-1.11/tf_python D:/Anaconda3/python.exe D:/TensorFlowB/build-1.11/tf_python/tensorflow/python/tools/api/generator/create_python_api.py --root_init_template=D:/TensorFlowB/build-1.11/tf_python/tensorflow/api_template.__init__.py --apidir=D:/TensorFlowB/build-1.11/tf_python/tensorflow --package=tensorflow.python --apiname=tensorflow D:/TensorFlowB/tensorflow-1.11/api_init_files_list.txt

copy D:\TensorFlowB\tensorflow-1.11\tensorflow\tools\docs
to D:\TensorFlowB\build-1.11\tf_python\tensorflow\tools\docs
copy D:\TensorFlowB\tensorflow-1.11\tensorflow\python\distribute
to D:\TensorFlowB\build-1.11\tf_python\tensorflow\python\distribute

build tf_python_build_pip_package
產生 D:\TensorFlowB\build-1.11\tf_python\dist\tensorflow_gpu-1.11.0-cp36-cp36m-win_amd64.whl
(tensorflow-1.11) D:\TensorFlowB\build-1.11>pip install tf_python\dist\tensorflow_gpu-1.11.0-cp36-cp36m-win_amd64.whl


使用 bazel
D:\TensorFlowB\tensorflow-1.11>bazel build --config=opt --config=cuda //tensorflow/tools/pip_package:build_pip_package
執行很久後可以發現
D:\TensorFlowB\tensorflow-1.11\bazel-out\x64_windows-opt\bin\tensorflow\tools\pip_package\simple_console_for_windows.zip
產生失敗,size=0

D:\TensorFlowB\tensorflow-1.11>cd bazel-out/x64_windows-opt/bin/tensorflow/tools/pip_package
edit simple_console_for_windows.zip-0.params
刪除有 .zip 的每一行

執行
D:\TensorFlowB\tensorflow-1.11\bazel-tensorflow>external\bazel_tools\tools\zip\zipper\zipper.exe vcC bazel-out/x64_windows-opt/bin/tensorflow/tools/pip_package/simple_console_for_windows.zip @bazel-out/x64_windows-opt/bin/tensorflow/tools/pip_package/simple_console_for_windows.zip-0.params
D:\TensorFlowB\tensorflow-1.11\bazel-tensorflow>cd ..
D:\TensorFlowB\tensorflow-1.11>bazel-bin\tensorflow\tools\pip_package\build_pip_package ..\tensorflow_pkg
安裝
(tensorflow-1.11) D:\TensorFlowB>pip install tensorflow_pkg\tensorflow-1.11.0-cp36-cp36m-win_amd64.whl

2018年11月17日 星期六

Build python from source

原先是為了要準備重建 OpenCV with CUDA
所以要準備 debug 版本的 python library
但是玩到後面發現,目前不需要了
費了我好多時間,所以要記錄下過程

VS2017 安裝時要選擇 Python 開發
下載安裝 Windows 10 SDK
https://www.python.org/downloads/source/
Python 3.6.7 - 2018-10-20 失敗
Python 3.6.7rc2 - 2018-10-13 選擇 Download XZ compressed source tarball
下載後解壓縮置於 D:\OpenCV_4\Python-3.6.7
開啟 powershell
到 D:\OpenCV_4\Python-3.6.7rc2\PCbuild 目錄
./build.bat -c Debug -p x64
./build.bat -c Debug -p Win32
./build.bat -t CleanAll

編譯過程會失敗,解決方法為
VS2017 開啟 D:\OpenCV_4\Python-3.6.7\PCbuild\pcbuild.sln
Property Pages/Configuration Properties/General/Windows SDK Version
10.0.17763.0
Property Pages/Configuration Properties/C/C++/Preprocessor
_X86_ 32位元
_AMD64_ 64位元


2018年11月7日 星期三

Windows PATH 環境變數太大,最多 2047 個字元

利用 regedit 修改

電腦\HKEY_LOCAL_MACHINE\SYSTEM\CurrentControlSet\Control\Session Manager\Environment


2018年11月6日 星期二

OpenCV Tesseract sample

samples/text/(sample)webcam_demo
Configuration Properties/Debugging/Environment
PATH=C:\Program Files\tesseract\bin;D:\TensorFlow\OCR\tesseract\win64\bin\Debug;D:\Anaconda3\Library\bin;C:\Program Files\NVIDIA GPU Computing Toolkit\CUDA\v10.0\bin;%PATH%
QT_PLUGIN_PATH=D:\Anaconda3\Library\plugins

修改 webcam_demo.cpp 指定下列檔案的路徑
D:/OpenCV_4/build34/testdata/contrib/text/trained_classifierNM1.xml
D:/OpenCV_4/build34/testdata/contrib/text/trained_classifierNM2.xml
D:/OpenCV_4/build34/testdata/contrib/text/OCRHMM_knn_model_data.xml.gz

OpenCV DNN Sample Text Detection

An Efficient and Accurate Scene Text Detector
有效又精確的文字檢測

參考 EAST text detector
下載 frozen_east_text_detection.pb

samples/dnn/(sample)text_detection

Configuration Properties/Debugging/Command Arguments
--model="D:\OpenCV_4\OpenCV OCR\opencv-text-detection\frozen_east_text_detection.pb" --width=640 --height=480

Configuration Properties/Debugging/Environment
PATH=D:\TensorFlow\OCR\tesseract\win64\bin\Debug;D:\Anaconda3\Library\bin;C:\Program Files\NVIDIA GPU Computing Toolkit\CUDA\v10.0\bin;%PATH%
QT_PLUGIN_PATH=D:\Anaconda3\Library\plugins

Edit text_detection.cpp 使用 OPENCL 加快速度(只能用 Intel, 不能使用 NVIDIA GPU)
    Net net = readNet(model);
    net.setPreferableTarget(DNN_TARGET_OPENCL);


EAST text detector

git clone https://github.com/argman/EAST EAST
下載 east_icdar2015_resnet_v1_50_rbox.zip 從
https://drive.google.com/open?id=0B3APw5BZJ67ETHNPaU9xUkVoV0U

Open
VS2015 x64 Native Tools Command Prompt
C:\Program Files (x86)\Microsoft Visual Studio 14.0\VC>
D:\OpenCV_4\OpenCV OCR\EAST\lanms>activate tensorflow
(tensorflow) D:\OpenCV_4\OpenCV OCR\EAST\lanms>python --version
Python 3.5.5 :: Anaconda, Inc.D:\OpenCV_4\OpenCV OCR\EAST\lanms>cl adaptor.cpp .\include\clipper\clipper.cpp /I .\include /I "D:\Anaconda3\include" /LD /Fe:adaptor.pyd /link/LIBPATH:"D:\Anaconda3\libs"

Edit lanms/__init__.py 註解掉下兩行
#if subprocess.call(['make', '-C', BASE_DIR]) != 0:  # return value
#    raise RuntimeError('Cannot compile lanms: {}'.format(BASE_DIR))

Edit run_demo_server.py
change
parser.add_argument('--checkpoint-path', default=checkpoint_path)
to
parser.add_argument('--checkpoint_path', default=checkpoint_path)
並註解掉
        #ret.update(get_host_info())

期間因為 tensorflow 使用 python3.5
但是程式使用的 python36.lib, 所以移除掉 tensorflow, 重新安裝

查詢已安裝的模組,等待環境完成,重新安裝(沒有使用)
pip freeze>requirements.txt
pip install -r requirements.txt

查詢已安裝的模組
(tensorflow) D:\>conda list

(base) D:\>conda env remove -n tensorflow
(base) D:\>conda create -n tensorflow pip python=3.6
(base) D:\>activate tensorflow
(tensorflow) D:\>pip install --ignore-installed --upgrade tensorflow-gpu
(tensorflow) D:\OpenCV_4\OpenCV OCR\EAST>pip install opencv-python
(tensorflow) D:\OpenCV_4\OpenCV OCR\EAST>pip install opencv-contrib-python
(tensorflow) D:\OpenCV_4\OpenCV OCR\EAST>pip install --ignore-installed --upgrade tensorflow-gpu
(tensorflow) D:\OpenCV_4\OpenCV OCR\EAST>pip install scipy
(tensorflow) D:\OpenCV_4\OpenCV OCR\EAST>pip install matplotlib
(tensorflow) D:\OpenCV_4\OpenCV OCR\EAST>pip install Flask
(tensorflow) D:\OpenCV_4\OpenCV OCR\EAST>conda install shapely
(tensorflow) D:\OpenCV_4\OpenCV OCR\EAST>python run_demo_server.py --checkpoint_path="..\east_icdar2015_resnet_v1_50_rbox"

2018年11月1日 星期四

Build OpenCV v4

目前最新的版本為 4.0.0, 穩定版本 3.4.3
查詢 opencv 版本
opencv_src\modules\core\include\opencv2\core\version.hpp
查詢 python 版本
(base) D:\OpenCV_4>python --version
Python 3.6.4 :: Anaconda, Inc.

CUDA 使用 10 版,9 or 9.1 都不行

下載 OpenCV 最新版本
(base) D:\OpenCV_4>git clone https://github.com/opencv/opencv opencv
下載指定版本
(base) D:\OpenCV_4>git clone https://github.com/opencv/opencv --branch 3.4 opencv34
更新之前下載的程式 到 遠端的最新版本
(base) D:\OpenCV_4\opencv>git pull origin master

Eigen 是一個 C++ 程式庫,支持線性代數,矩陣,向量運算
http://eigen.tuxfamily.org
解壓縮後移至 D:\OpenCV_4\dep

Intel TBB Library 不需安裝
用 Intel IPP 即可

MikTex 排版軟體
http://miktex.org/

(base) D:\OpenCV_4>python -m pip install --upgrade pip
Sphinx Python文件生成工具,支持 LaTeX(可以產生PDF)
(base) D:\OpenCV_4>pip install sphinx
NumPy 是Python語言的一個擴充程式庫。支援高階大量的維度陣列與矩陣運算。
(base) D:\OpenCV_4>pip install numpy

Visual Studio Installer 安裝
個別元件/VC++ 2017 v141 工具組

OpenCV 的額外模組
git clone https://github.com/opencv/opencv_contrib open_contrib
git clone https://github.com/opencv/opencv_contrib --branch 3.4 open_contrib_3.4

CMake
D:/OpenCV_4/opencv
D:/OpenCV_4/build_64
Visual Studio 14 2015 Win64
EIGEN_INCLUDE_PATH=D:/OpenCV_4/dep/eigen-eigen-b3f3d4950030
OPENCV/OPENCV_EXTRA_MODULES_PATH=D:\OpenCV_4\opencv34\modules
BUILD/BUILD_EXAMPLES checked

opencv_cudev 專案出現 LNK2019 cv::__termination 錯誤
修改 modules/opencv_cudev/CMakeLists.txt, 在
set(the_description "CUDA device layer")
增加下一行
set(OPENCV_SKIP_DLLMAIN_GENERATION ON)

opencv_cvv 專案 stringutils.cpp 出現 C2001, C2143, C2146 等錯誤
是因為檔案字元集的問題,開啟 stringutils.cpp, 重新存檔成
UTF-8 with signature

以下增加 Tesseract 功能,參考 Tesseract OCR 安裝
修改 modules/opencv_text/CMakeLists.txt, 增加下一行
set(Tesseract_FOUND 1)
if(NOT CMAKE_CROSSCOMPILING OR OPENCV_FIND_TESSERACT)

修改 opencv_text Property Pages/Configuration Properties/
C/C++/General/Additional Include Directories 增加
C:\Program Files\tesseract\include
Linker/General/Additional Library Directories 增加
D:\TensorFlow\OCR\tesseract\win64\Debug
C:\Program Files\tesseract\lib
Linker/Input/Additional Dependencies 增加
tesseract40d.lib (Debug)
tesseract40.lib (Release)

2018年10月26日 星期五

Tesseract OSD_example.cpp


// 決定頁面,行到行,字到字 的方向
#include "pch.h"
#include <iostream>

#include <tesseract/baseapi.h>
#include <leptonica/allheaders.h>

int main()
{
// 頁面方向
static const char* const sOrientation[] {
"PAGE_UP",
"PAGE_RIGHT",
"PAGE_DOWN",
"PAGE_LEFT",
};
// 字到字的方向
static const char* const sWritingDirection[] {
"LEFT_TO_RIGHT",
"RIGHT_TO_LEFT",
"TOP_TO_BOTTOM",
};
// 行到行的方向
static const char* const sTextlineOrder[]{
"LEFT_TO_RIGHT",
"RIGHT_TO_LEFT",
"TOP_TO_BOTTOM",
};

Pix *image = pixRead("D:\\TensorFlow\\OCR\\aaa.png");
tesseract::TessBaseAPI *api = new tesseract::TessBaseAPI();
if (api->Init(NULL, "eng")) {
std::cerr << "Could not initialize tesseract.\n";
}
api->SetPageSegMode(tesseract::PSM_AUTO_OSD);
api->SetImage(image);
api->Recognize(0);
tesseract::PageIterator* it = api->AnalyseLayout();
tesseract::PageIteratorLevel level = tesseract::RIL_WORD;
if (it != 0) {
do {
tesseract::Orientation orientation;
tesseract::WritingDirection direction;
tesseract::TextlineOrder order;
float deskew_angle;

it->Orientation(&orientation, &direction, &order, &deskew_angle);
printf("Orientation: %s;\nWritingDirection: %s\nTextlineOrder: %s\n" \
"Deskew angle: %.4f\n",
sOrientation[orientation], sWritingDirection[direction],
sTextlineOrder[order], deskew_angle);
int left, top, right, bottom;
it->BoundingBox(level, &left, &top, &right, &bottom);
printf("BoundingBox: (%d, %d) (%d, %d)\n",
left, top, right, bottom);
} while (it->Next(level));
}

api->End();
pixDestroy(&image);
}

Tesseract ResultIterator.cpp

// 參照 Tesseract API for VS2017
// 依據字符辨識,列出所有候選字
#include "pch.h"
#include <iostream>

#include <tesseract/baseapi.h>
#include <leptonica/allheaders.h>

int main()
{
Pix *image = pixRead("D:\\TensorFlow\\OCR\\aaa.png");
tesseract::TessBaseAPI *api = new tesseract::TessBaseAPI();
if (api->Init(NULL, "eng")) {
std::cerr << "Could not initialize tesseract.\n";
}
api->SetPageSegMode(tesseract::PSM_AUTO_OSD);
api->SetImage(image);
api->Recognize(0);
tesseract::ResultIterator* ri = api->GetIterator();
tesseract::PageIteratorLevel level = tesseract::RIL_SYMBOL;
//tesseract::PageIteratorLevel level = tesseract::RIL_TEXTLINE;
if (ri != 0) {
do {
const char* word = ri->GetUTF8Text(level);
float conf = ri->Confidence(level);
int x1, y1, x2, y2;
ri->BoundingBox(level, &x1, &y1, &x2, &y2);
printf("word: '%s';  \tconf: %.2f; BoundingBox: %d,%d,%d,%d;\n",
word, conf, x1, y1, x2, y2);
if (level = tesseract::RIL_SYMBOL) {
// 列出所有可能的候選字
tesseract::ChoiceIterator ci(*ri);
do {
const char* choice = ci.GetUTF8Text();
printf("\t\t%s conf: %f\n", choice, ci.Confidence());
} while (ci.Next());
printf("---------------------------------------------\n");
}
delete[] word;
} while (ri->Next(level));
}

api->End();
pixDestroy(&image);
}

Tesseract GetComponentImages.cpp

// 參照 Tesseract API for VS2017
// 依據行辨識
int main()
{
Pix *image = pixRead("D:\\temp\\OpenCV_err.png");
tesseract::TessBaseAPI *api = new tesseract::TessBaseAPI();
if (api->Init(NULL, "eng")) {
std::cerr << "Could not initialize tesseract.\n";
}
api->SetImage(image);

Boxa* boxes = api->GetComponentImages(tesseract::RIL_TEXTLINE, true, NULL, NULL);
fprintf(stdout, "Found %d textline image components.\n", boxes->n);
for (int i = 0; i < boxes->n; i++) {
BOX* box = boxaGetBox(boxes, i, L_CLONE);
api->SetRectangle(box->x, box->y, box->w, box->h);
char* ocrResult = api->GetUTF8Text();
int conf = api->MeanTextConf();
fprintf(stdout, "Box[%d]: x=%d, y=%d, w=%d, h=%d, confidence: %d, text: %s",
i, box->x, box->y, box->w, box->h, conf, ocrResult);
delete[] ocrResult;
}

api->End();
pixDestroy(&image);
}

Tesseract BasicExample.cpp

// 參照 Tesseract API for VS2017
// 整張圖片一次辨識
#include "pch.h"
#include <iostream>

#include <tesseract/baseapi.h>
#include <leptonica/allheaders.h>

int main()
{
char *outText = NULL;
tesseract::TessBaseAPI *api = new tesseract::TessBaseAPI();
// 英文加中文
if (api->Init(NULL, "eng+chi_tra")) {
std::cerr << "Could not initialize tesseract.\n";
}
Pix *image = pixRead("D:\\TensorFlow\\OCR\\bbb.png");
// 以下兩行,可 擇一 或 都不執行
api->SetPageSegMode(tesseract::PSM_SINGLE_BLOCK); // 預設值
//api->SetPageSegMode(tesseract::PSM_SINGLE_LINE);
api->SetImage(image);
//api->SetRectangle(40, 5, 150, 30);
outText = api->GetUTF8Text();
// 要顯示中文要經很多轉換
int len = ::MultiByteToWideChar(CP_UTF8, NULL, outText, -1, NULL, 0);
wchar_t* wszString = new wchar_t[len + 1];
::MultiByteToWideChar(CP_UTF8, NULL, outText, -1, wszString, len);
wszString[len] = '\0';
len = ::WideCharToMultiByte(CP_ACP, 0, wszString, -1, NULL, 0, NULL, NULL);
char* szBig5 = new char[len + 1];
::WideCharToMultiByte(CP_ACP, 0, wszString, -1, szBig5, len, NULL, NULL);
szBig5[len] = '\0';

std::cout << "=======================\n";
std::cout << outText << "\n";
std::cout << "=======================\n";
std::cout << wszString << "\n";
std::cout << "=======================\n";
std::cout << szBig5 << "\n";
std::cout << "=======================\n";
api->End();
if (outText) delete[] outText;
if (wszString) delete[] wszString;
pixDestroy(&image);
}

Tesseract API for VS2017

參照 Tesseract OCR 安裝

c:\users\userName\.cppan\stroage 目錄下搜尋 leptonica
可以找到 C:\Users\userName\.cppan\storage\src\8f\a3\90d7\src 目錄
拷貝所有檔案至 C:\Program Files\tesseract\include\leptonica

VS2013 不能編譯, VS2017 才可以
Property Pages/Platform 選 x64
Property Pages/Configuration 選 Debug
Property Pages/Configuration Properties/Debugging/Environment
PATH=%PATH%;D:\TensorFlow\OCR\tesseract\win64\bin\Debug
Property Pages/Configuration Properties/C/C++/General/Additional Include Directories
新增 C:\Program Files\tesseract\include
Property Pages/Configuration Properties/Linker/General/Additional Library Directories
新增 D:\TensorFlow\OCR\tesseract\win64\Debug
Property Pages/Configuration Properties/Linker/Input/Additional Dependencies
新增 tesseract40d.lib
新增 pvt.cppan.demo.danbloomberg.leptonica-1.76.0.lib

Property Pages/Platform 選 x64
Property Pages/Configuration 選 Release
Property Pages/Configuration Properties/Debugging/Environment
PATH=%PATH%;C:\Program Files\tesseract\bin
Property Pages/Configuration Properties/C/C++/General/Additional Include Directories
新增 C:\Program Files\tesseract\include
Property Pages/Configuration Properties/Linker/General/Additional Library Directories
新增 C:\Program Files\tesseract\lib
Property Pages/Configuration Properties/Linker/Input/Additional Dependencies
新增 tesseract40.lib
新增 pvt.cppan.demo.danbloomberg.leptonica-1.76.0.lib

執行 Debug 程式時,若是使用 Release 的 lib, delete GetUTF8Text() 產生的記憶體
會產生 Exception


2018年10月19日 星期五

Tesseract OCR

https://digi.bib.uni-mannheim.de/tesseract/
可以下載安裝版
雖然它只可以執行,不能開發程式,但還是先安裝,因為要使用它的 tessdata
等用完再移除吧
https://github.com/UB-Mannheim/tesseract/wiki/Windows-build
有一些安裝檔如何產生的說明,但它是利用 Linux 跨平台編譯產生的

使用 Vcpkg
開啟 PowerShell
git clone https://github.com/Microsoft/vcpkg.git vcpkg
cd vcpkg
.\bootstrap-vcpkg.bat
產生 vcpkg.exe
.\vcpkg install tesseract:x64-windows
產生 installed\x64-windows\tools\tesseract
.\vcpkg install tesseract:x64-windows-static
產生 installed\x64-windows-static\tools\tesseract
.\vcpkg install tesseract:x86-windows-static
有 include, dll, lib, 但卻是 3.05 版

使用 cmake, cppan, vs2017
原先使用之前的 cmake(3.10版), 一直失敗, 更新成 cmake(3.12版)才成功
下載 cppan
cppan 會使用 c:\users\userName\.cppan 目錄,若有失敗要重新開始,刪除這個目錄
設定 PATH 到 cmake 和 cppan
開啟 PowerShell
git clone https://github.com/tesseract-ocr/tesseract tesseract
cd tesseract
mkdir win64
cd win64
PS D:\Tesseract\tesseract\win64> $env:Path += ";D:\Tesseract\cppan-master-Windows-client;C:\Program Files\CMake\bin"
PS D:\Tesseract\tesseract\win64> $env:path.split(";")
cppan ..
cmake .. -G "Visual Studio 15 2017 Win64"
開啟 vs2017
開啟 tesseract\win64\tesseract.sln
先編譯 "CPPAN Targets/Service/cppan-d-b-d" 專案,會產生錯誤
最主要為程式內含有錯誤的字元
開啟這些檔案,另存新檔,選擇 Save 旁邊的小按鈕,選擇 Save with encoding
Encoding 選擇 Unicode (UTF-8 with signature)
ALL_BUILD 可以成功,接著 build INSTALL
此時會產生 MSB307 setlocal 錯誤
主要是因為沒有權限安裝程式到 C:\Program Files\tesseract
使用 Administrator 身分重新開啟 vs2017
重新 build 即可
增加中文字(含手寫)的支援
到 https://github.com/tesseract-ocr/tessdata 下載 tessdata
但是我不知道要下載那些檔案,乾脆使用安裝檔內的 tessdata
設定環境變數 TESSDATA_PREFIX=C:\Program Files\tesseract\tessdata


發現在部分電腦上速度會非常慢,可關閉 openmp 改善
修改 project libtesseract 和 tesseract 的 property
C/C++/Language/Open MP Support: No(/openmp-)

2018年10月6日 星期六

build darknet yolo

git clone https://github.com/AlexeyAB/darknet.git

下載 CUDA Toolkit 9.1
https://developer.nvidia.com/cuda-toolkit-archive
安裝失敗,請參考下列步驟
https://yingrenn.blogspot.com/2018/07/cuda.html

下載 cuDNN, 請選擇 cuDNN v7.0 for CUDA 9.1 for 正確 Windows 版本
https://developer.nvidia.com/rdp/cudnn-archive

使用 VS2015 開啟 D:\Tensorflow\Yolo\darknet\build\darknet\darknet.sln
切換 Win32 到 x64
Project/darknet properities/
輸入 Configuration Properties/"CUDA C/C++"/CUDA Toolkit Custom Dir
C:\Program Files\NVIDIA GPU Computing Toolkit\CUDA\v9.1
輸入 Additional Include Directories
D:\Tensorflow\Yolo\opencv\build\include
D:\CUDNN\cudnn-9.1-windows7-x64-v7\cuda\include
輸入 Additional Library Directories
D:\Tensorflow\Yolo\opencv\build\x64\vc14\lib
D:\CUDNN\cudnn-9.1-windows7-x64-v7\cuda\lib\x64

2018年10月5日 星期五

git 學習紀錄

Git 只能管理單純文字檔,不能處理MS Word, pdf, 圖片或執行檔等非文字檔

安裝
# 如果你的 Linux 是 Ubuntu:
$ sudo apt-get install git-all
# 如果你的 Linux 是 Fedora:
$ sudo yum install git-all

Untracked: 在工作目錄內,尚未被追蹤或不需追蹤的檔案
Unmodified: 在工作目錄內,尚未被修改的檔案
Modified: 在工作目錄內,已經被修改的檔案
Staged: 在工作目錄內,被 add 到版本庫,尚未被 commit

設定使用者和email
$ git config --global user.name "UserName"
$ git config --global user.email "username@email.com"

在工作目錄上建立版本庫,會產生 ".git" 目錄
$ git init

查詢版本庫狀態
$ git status

將檔案放入版本庫的 stage 內
$ git add file.py
將資料夾中所有未被添加的檔案,放入版本庫的 stage 內
$ git add .

確認提交
$ git commit -m "修改說明"
確認提交(可省掉 git add)
$ git commit -am "修改說明"

查詢紀錄
$ git log
查詢紀錄,每個 commit 一行
$ git log --oneline
查詢紀錄,每個 commit 一行,並顯示 branch
$ git log --oneline --graph

查詢這次還沒add(unstaged)的修改部分 和 上個已經commit或已經add(staged)的文件差異
$ git diff
查詢已經add(staged)的修改部分 和 上個已經commit的文件差異
$ git diff --cached
查詢這次還沒add(unstaged)的修改部分 和 上個已經commit的文件差異
$ git diff HEAD

checkout 某一(id)版本,到工作目錄(HEAD 指到 id)
$ git checkout id
checkout 最新版本,到工作目錄(HEAD 指到最新 id)
$ git checkout master
checkout 某一(id)版本的 file.py
$ git checkout id -- file.py

查看所有 HEAD 改動
$ git reflog

直接修改上個 commit,不說明
$ git commit --amend --no-edit

reset 回到上一次的 commit
$ git reset --hard HEAD
reset 回到上上一次的 commit
$ git reset --hard HEAD^
reset 回到某一次 commit
$ git reset --hard id
reset 可搭配三種參數 soft, mixed(default), 以及 hard
soft 只回復 Repository
mixed 回復 staged 和 Repository
hard 回復 staged 和 Repository 和工作目錄(通常使用這個)

查詢分支
$ git branch
查詢本地和遠端的分支
$ git branch -a
查詢遠端的分支
$ git branch -r
建立分支 test
$ git branch test
checkout 分支 test
$ git checkout test
建立分支 test 並且切換(checkout)到 test
$ git checkout -b test

合併分支
先切回 master
$ git checkout master
將 test 合併至 master
$ git merge --no-ff -m "合併說明" test

合併有衝突時,先修改檔案,再 commit, 衝突就解決了
$ git commit -am "解決說明"

暫存修改
$ git stash
查詢暫存
$ git stash list
回復暫存
$ git stash pop

新增遠端節點 origin
$ git remote add origin https://github.com/UserName/git-name.git
推送本地的 master 分支到 origin
$ git push -u origin master
推送本地的 test 分支到 origin
$ git push -u origin test
本地端修改
$ git commit -am "修改說明"
推送修改到 origin
$ git push -u origin master
取回最新的遠端資料到本地
$ git pull origin master

2018年7月9日 星期一

CUDA 安裝失敗

CUDA 安裝失敗,通常是由於 Visual Studio Integration 失敗
所以透過自訂安裝,跳過不安裝 Visual Studio Integration, 可以安裝成功
Installer Type 要選擇 exe(local)

而 Visual Studio Integration 的安裝方式如下:
1. 使得可以編譯 CUDA 程式
注意安裝 CUDA 時的路徑,拷貝出 CUDAVisualStudioIntegration 目錄夾
將 D:\CUDAVisualStudioIntegration\extras\visual_studio_integration\MSBuildExtensions
目錄下所有檔案拷貝至
C:\Program Files (x86)\MSBuild\Microsoft.Cpp\v4.0\V140\BuildCustomizations
2. 使得 Visual Studio 可以新建 CUDA 專案
將目錄
D:\CUDAVisualStudioIntegration\extras\visual_studio_integration\CudaProjectVsWizards
拷貝至
C:\Program Files (x86)\Microsoft Visual Studio 14.0\Common7\IDE\Extensions
3. 安裝
D:\CUDAVisualStudioIntegration\NVIDIA_Nsight_Visual_Studio_Edition_Win64_5.4.0.17229.msi

2018年7月3日 星期二

tensorflow audio recognition 之 SpeechActivity.java

分為 record thread 和 recognize thread, 兩個 thread 依靠 recordingBuffer 交換資料
兩者速度不會一致,所以 recognize thread 可能重複 recognize, 也可能漏

short[] recordingBuffer = new short[RECORDING_LENGTH];
int recordingOffset = 0;

private void record() {
  int numberRead = record.read(audioBuffer, 0, audioBuffer.length);
  int maxLength = recordingBuffer.length;
  int newRecordingOffset = recordingOffset + numberRead;
  //int secondCopyLength = Math.max(0, newRecordingOffset - maxLength);
  if (newRecordingOffset > maxLength) {
    secondCopyLength = newRecordingOffset - maxLength;
  } else {
    secondCopyLength = 0;
  }
  int firstCopyLength = numberRead - secondCopyLength;
  System.arraycopy(audioBuffer, 0, recordingBuffer, recordingOffset, firstCopyLength);
  System.arraycopy(audioBuffer, firstCopyLength, recordingBuffer, 0, secondCopyLength);
  recordingOffset = newRecordingOffset % maxLength;
}

private void recognize() {
  int maxLength = recordingBuffer.length;
  int firstCopyLength = maxLength - recordingOffset;
  int secondCopyLength = recordingOffset;
  System.arraycopy(recordingBuffer, recordingOffset, inputBuffer, 0, firstCopyLength);
  System.arraycopy(recordingBuffer, 0, inputBuffer, firstCopyLength, secondCopyLength);
}

Yolo

目錄 data/img

檔案 data/obj.data
classes= 2
train  = data/train.txt
valid  = data/train.txt
names = data/obj.names (相對於執行檔目錄)
backup = backup/

檔案 data/obj.names
air
bird

檔案 data/train.txt
data/img/air1.jpg
data/img/air2.jpg
data/img/air3.jpg

檔案 yolo-obj.cfg
(測試用)
batch=1
subdivisions=1
(訓練用)
batch=64
subdivisions=1, (視記憶體大小修改,記憶體小則使用64)
修改所有 [yolo] 層內的
classes =
修改所有 [yolo] 前一個 [convolutional] 層內的
filters = (classes + 5) * 3

標記
yolo_mark.exe data/img data/train.txt data/obj.names

訓練
darknet.exe detector train data/obj.data yolo-obj.cfg darknet19_448.conv.23
obj.data 內的 backup 指定輸出 weights 存放位置
darknet19_448.conv.23: 其實就是 weights, 要接續中斷的訓練時,則改為新產生的 weights
-dont_show: 不顯示 Loss-Window

檢測訓練結果(IoU, mAP)
darknet.exe detector map data/obj.data yolo-obj.cfg backup\yolo-objj_7000.weights

COCO Yolo v3(4GB GPU): yolov3.cfg, yolov3.weights
COCO Yolo v3 tiny(1GB GPU): yolov3-tiny.cfg, yo.ov3-tiny.weights
COCO Yolo v2(4GB GPU): yolov2.cfg, yolov2.weights
VOC Yolo v2(4GB GPU): yolo-voc.cfg, yolo-voc.weights
COCO Yolo v2 tiny(1GB GPU): yolov2-tiny.cfg, yolov2-tiny.weights
VOC Yolo v2 tiny(1GB GPU): yolov2-tiny-voc.cfg, yolov2-tiny-voc.weights
以上似乎是訓練時的需求,檢測或分類時似乎沒那麼大的需求

darknet.exe 參數
-i <index>, 指定 GPU, 可用 nvidia-smi.exe 查詢
-nogpu, 不使用 GPU
-thresh <val>, 預設為 0.25
-c <num>, OpenCV 影像, 預設為 0
-ext_output, 輸出物件位置
detector test, 相片
detector demo, 影片
detector train, 訓練
detector map, 檢測訓練結果
classifier predict, 分類

./darknet detect cfg/yolov3.cfg yolov3.weights data/dog.jpg
./darknet detector test cfg/coco.data cfg/yolov3.cfg yolov3.weights data/dog.jpg
以上兩個命令一樣

使用命令取得 yolov3-tiny.conv.15
darknet.exe partial cfg/yolov3-tiny.cfg yolov3-tiny.weights yolov3-tiny.conv.15 15

如何增進物件檢測
訓練前:
.cfg 檔內的 random=1
增加 .cfg 檔內的 width, height (須為 32 的倍數)
執行下列命令,重新計算 anchors, 更改 .cfg 檔內的 anchors
darknet.exe detector calc_anchors voc.data -num_of_clusters 9 -width 416 -height 416
小心標註相片內的物件,每一物件都要標註,而且不要標錯
每個物件最好有 2000 以上的影像,包含有不同的大小、角度、光線、背景等
不要被檢出的物件要在相片內,而且不能被標註

訓練時相片和標註檔的對映
darknet.c
int main(int argc, char **argv)
>run_detector(argc, argv);
detector.c
void run_detector(int argc, char **argv)
>train_detector(datacfg, cfg, weights, gpus, ngpus, clear, dont_show);
void train_detector(char *datacfg, char *cfgfile, char *weightfile, int *gpus, int ngpus, int clear, int dont_show)
> pthread_t load_thread = load_data(args);
data.c
pthread_t load_data(load_args args)
>if(pthread_create(&thread, 0, load_threads, ptr)) error("Thread creation failed");
void *load_threads(void *ptr)
>threads[i] = load_data_in_thread(args);
if(pthread_create(&thread, 0, load_thread, ptr)) error("Thread creation failed");
void *load_thread(void *ptr)
>*a.d = load_data_detection(a.n, a.paths, a.m, a.w, a.h, a.c, a.num_boxes, a.classes, a.flip, a.jitter, a.hue, a.saturation, a.exposure, a.small_object);
data load_data_detection(int n, char **paths, int m, int w, int h, int c, int boxes, int classes, int use_flip, float jitter, float hue, float saturation, float exposure, int small_object)
>fill_truth_detection(filename, boxes, d.y.vals[i], classes, flip, dx, dy, 1./sx, 1./sy, small_object, w, h);
void fill_truth_detection(char *path, int num_boxes, float *truth, int classes, int flip, float dx, float dy, float sx, float sy, int small_object, int net_w, int net_h)
>replace_image_to_label(path, labelpath);
utils.c
void replace_image_to_label(char *input_path, char *output_path)

在相片上標註偵測出的物件
image.c
void draw_detections_cv_v3(IplImage* show_img, detection *dets, int num, float thresh, char **names, image **alphabet, int classes, int ext_output)

network.c
將 image 轉成 network
float *network_predict(network net, float *input)
從 network 中取得 detection
detection *get_network_boxes(network *net, int w, int h, float thresh, float hier, int *map, int relative, int *num, int letter)

2018年6月8日 星期五

Training your Object Detection Classifier

Download TensorFlow Models
Download object detection models from model zoo

set PATH=%PATH%;..\..\protoc-3.5.1-win32\bin
cd models-master\research
protoc.exe object_detection\protos\anchor_generator.proto --python_out=.
protoc.exe object_detection\protos\argmax_matcher.proto --python_out=.
.
.
.
protoc.exe object_detection\protos\train.proto --python_out=.
cd ..\..\

cd models-master\research
python setup.py build
python setup.py install

修改 models-master/research/object_detection/trainer.py
    # Soft placement allows placing on CPU ops without GPU implementation.
    session_config = tf.ConfigProto(allow_soft_placement=True,
                                    log_device_placement=False)
    session_config.gpu_options.allow_growth=True
    session_config.gpu_options.allocator_type = "BFC"
    session_config.gpu_options.per_process_gpu_memory_fraction = 0.4


LabelImg 標註相片,產生 .xml
修改 xml_to_csv.py 由 .xml 產生 .csv
修改 generate_tfrecord.py 內的 class_text_to_int(row_label), 標註從 1 開始,不是 0
由 .csv 產生 .record(TFRecord 檔)
準備 labelmap.pbtxt, 標註從 1 開始,不是 0

準備修改 models-master\research\object_detection\samples\configs


2018年6月6日 星期三

Optimizer 選擇

tf.train.GradientDescentOptimizer
梯度下降法
常見梯度下降法 BGD, SGD, MBGD
BGD: Batch gradient descent
採用整個訓練集的數據來計算,所以速度慢,若遇到大量的數據集會更慢
SGD: Stochastic gradient descent
隨機採用部分的訓練集來計算,所以速度較快,但是因為更新快,會造成震盪
MBGD: Mini-batch gradient descent

tf.train.AdagradOptimizer
Adagrad 會累加之前所有的梯度平方,
對低頻的參數做較大的更新,對高頻做較小的更新,
用於處理大的希疏矩陣,可以自動變更學習速率

tf.train.AdadeltaOptimizer
Adadelta 是對 Adagrad 的擴展,甚至不需要提前設定學習率

tf.train.MomentumOptimizer
如果梯度長時間保持一個方向,則增大參數更新幅度。
可以想像成從山頂放下一個球,會越滾越快

tf.train.RMSPropOptimizer
RMSProp 和 Adadelta 都是為了解決 Adagrad 學習率急劇下降的問題

tf.train.AdamOptimizer
它綜合了 Momentum 和 RMSProp 方法,是目前最常用的優化器


2018年6月5日 星期二

losses function

losses function

分類問題使用 softmax_cross_entropy_with_logits
回歸問題(如預測速度,價格,溫度等)使用均方誤差

loss = tf.reduce_mean(tf.reduce_sum(tf.square(result - prediction), reduction_indices=[1]))

Activation Function

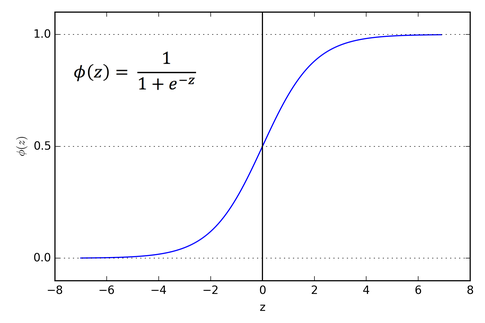
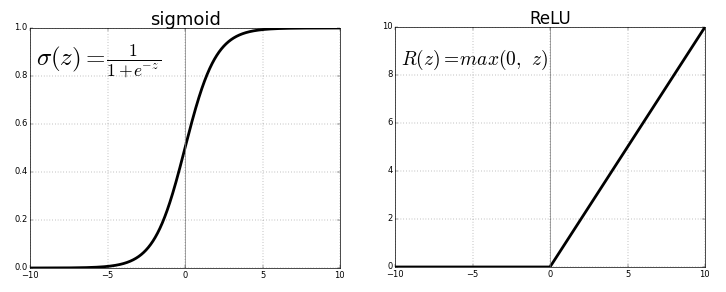
Sigmoid
輸出介於0-1, 特別適用於概率輸出的模型
本身為單調函數(monotonic function)(漸增或漸減), 但導數不是
邏輯上,在訓練期間可能會卡住
一般會使用 softmax function 替代, 使得每一個元素都在0-1, 並且所有元素合為1
適用於多樣分類
圖片來源
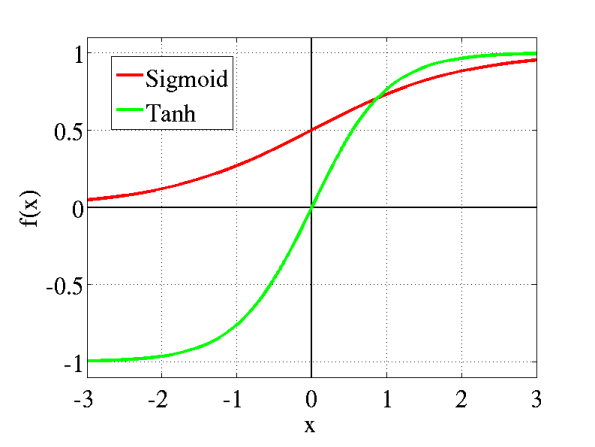
Tanh
類似 sigmoid, 輸出介於 -1 到 1
本身為單調函數(monotonic function)(漸增或漸減), 但導數不是
適用於二分類
圖片來源
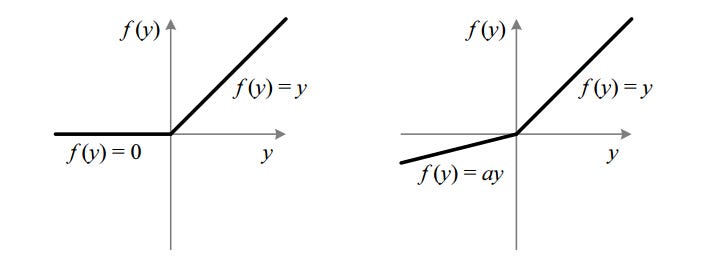
ReLU
為卷積神經網路或深度學習最常用的函數
輸出範圍從 0 到無限大
計算輛小,只需判斷輸入是否大於 0
圖片來源

激勵函數一般建議使用ReLU, 或者變形的 Leaky ReLU, Tanh 和 Sigmoid 盡量別用,
因為他們有梯度消失的問題,是類神經網路加深時主要的訓練障礙。
圖片來源

2018年5月3日 星期四

jupyter notebook

jupyter notebook 出錯

(tensorflow) D:\TensorFlow>jupyter notebook
Traceback (most recent call last):
  File "d:\anaconda3\envs\tensorflow\lib\runpy.py", line 193, in _run_module_as_main
    "__main__", mod_spec)
  File "d:\anaconda3\envs\tensorflow\lib\runpy.py", line 85, in _run_code
    exec(code, run_globals)
  File "D:\Anaconda3\envs\tensorflow\Scripts\jupyter-notebook.EXE\__main__.py", line 5, in <module>
  File "d:\anaconda3\envs\tensorflow\lib\site-packages\notebook\notebookapp.py", line 44, in <module>
    from zmq.eventloop import ioloop
  File "d:\anaconda3\envs\tensorflow\lib\site-packages\zmq\__init__.py", line 47, in <module>
    from zmq import backend
  File "d:\anaconda3\envs\tensorflow\lib\site-packages\zmq\backend\__init__.py", line 40, in <module>
    reraise(*exc_info)
  File "d:\anaconda3\envs\tensorflow\lib\site-packages\zmq\utils\sixcerpt.py", line 34, in reraise
    raise value
  File "d:\anaconda3\envs\tensorflow\lib\site-packages\zmq\backend\__init__.py", line 27, in <module>
    _ns = select_backend(first)
  File "d:\anaconda3\envs\tensorflow\lib\site-packages\zmq\backend\select.py", line 26, in select_backend
    mod = __import__(name, fromlist=public_api)
  File "d:\anaconda3\envs\tensorflow\lib\site-packages\zmq\backend\cython\__init__.py", line 6, in <module>
    from . import (constants, error, message, context,
ImportError: cannot import name 'constants'

重新安裝 pyzmq 可以解決
pip uninstall pyzmq
pip install pyzmq


2018年5月2日 星期三

python labelImg.py 增加另一資料(pose)輸入

執行遇到問題
conda install pyqt=5
pip install --upgrade lxml
pyrcc5 -o resources.py resources.qrc

出現錯誤
Traceback (most recent call last):
  File "labelImg.py", line 1452, in <module>
    sys.exit(main())
  File "labelImg.py", line 1448, in main
    app, _win = get_main_app(sys.argv)
  File "labelImg.py", line 1441, in get_main_app
    argv[3] if len(argv) >= 4 else None)
  File "labelImg.py", line 109, in __init__
    self.settings.load()
  File "D:\TensorFlow\ObjectDetection\labelImg\libs\settings.py", line 33, in load
    self.data = pickle.load(f, encoding="iso-8859-1")
ModuleNotFoundError: No module named 'PyQt4'
請刪除 c:\users\user name\.labelImgSettings.pkl

pascal_voc_io.py
  def addBndBox(self, xmin, ymin, xmax, ymax, name, pose, difficult):
    bndbox['pose'] = pose
self.boxlist.append(bndbox)
  def appendObjects(self, top):
    for each_object in self.boxlist:
      pose.text = unicode(each_object['pose'])
  def save(self, targetFile=None):
    self.appendObjects(root)

labelFile.py
  def savePascalVocFormat(self, filename, shapes, imagePath, imageData, lineColor=None, fillColor=None, databaseSrc=None):
    for shape in shapes:
  pose = shape['pose']
  writer.addBndBox(bndbox[0], bndbox[1], bndbox[2], bndbox[3], label, pose, difficult)

canvas.py

labelImage.py
class MainWindow(QMainWindow, WindowMixin):
  def __init__(self, defaultFilename=None, defaultPrefdefClassFile=None, defaultSaveDir=None):
    self.labelList = QListWidget()
self.canvas = Canvas(parent=self)
  def saveLabels(self, annotationFilePath):
    shapes = [format_shape(shape) for shape in self.canvas.shapes]
self.labelFile.savePascalVocFormat(annotationFilePath, shapes, self.filePath, self.imageData, self.lineColor.getRgb(), self.fillColor.getRgb())
  def addLabel(self, shape):
    item = HashableQListWidgetItem(shape.label)
item.setPose(shape.pose)
self.labelList.addItem(item)
  def currentItem(self):
    items = self.labelList.selectedItems()
return items[0]
  def editLabel(self):
    item = self.currentItem()
text, pose = self.labelDialog.popUp(item.text(), item.getPose())
item.setPose(pose)
item.setLabel(label)
item.setText(label + "_" + pose)
  def labelItemChanged(self, item):
    shape = self.itemsToShapes[item]
shape.label = item.text()
class HashableQListWidgetItem(QListWidgetItem):

labelDialog.py
  def popUp(self, text='', pose='', move=True):

2018年4月28日 星期六

Kennel 升級紀錄

Windows 10 回復原廠設定不能使用
出現 "重設您的電腦時發生問題 沒有做任何變更"
官方網站下載 Windows 10
此時會有兩種選項,一是升級本身的電腦,二是建立安裝媒體(USB 隨身碟 8G)
兩者皆有測試過
似乎授權已經寫入 BIOS, 所以即使換硬碟重灌也可以直接啟用

部分的硬碟分割區無法刪除
需用 命令題是字元 執行 diskpart
DISKPART> list disk
DISKPART> select disk 1
DISKPART> list disk
DISKPART> list partition
DISKPART> clean

資料庫使用
mariadb-10.2.14-winx64.msi
備份使用
dump.bat
@echo off
set dt=%date:~0,10%
rem date format is "YYYY-MM-DD"
set dy=%dt:~0,4%
set dm=%dt:~5,2%
set dd=%dt:~8,2%
rem echo %dt%
set TODAY=%dy%%dm%%dd%
dump.bat
call today.bat
"c:\Program Files\MariaDB 10.2\bin\mysqldump.exe" -u root -pmark1234 -B kennel util>mariadb_%today%.sql
"c:\Program Files\7-Zip\7z.exe" a -tzip mariadb_%today%.sql.zip mariadb_%today%.sql
del mariadb_%today%.sql


開發環境使用
jdk-8u172-windows-i586.exe (給舊的 Eclipse 3 使用 32位元環境)
jdk-8u172-windows-x64.exe
eclipse-jee-oxygen-3a-win32-x86_64.zip
External JARs 換位置了,之前可以隨便放,現在必須放在 WEB-INF\lib
否則程式執行時會發生 ClassNotFoundException
使用 Tomcat v9.0 搭配 java 10 時,發生
-Djava.endorsed.dirs=C:\Program Files\Apache Software Foundation\Tomcat 9.0\endorsed is not supported.
錯誤,即使將 Run/Debug Configurations/Arguments/VM arguments 內的
-Djava.endorsed.dirs="C:\Program Files\Apache Software Foundation\Tomcat 9.0\endorsed"
刪除,下次執行時,依舊又出現,換成舊版的 java 即可解決

網站使用
apache-tomcat-9.0.7.exe (不能搭配 java 10)
修改 config 下的 server.xml 和 context.xml 請注意權限
若不修改權限,作業系統會搞鬼,讓你以為修改成功,浪費時間抓蟲
Tomcat v6.0 時, server.xml 為
<Context docBase="Main" path="/Kennel" reloadable="true" source="org.eclipse.jst.jee.server:Main">
<Resource name="jdbc/MainDS" auth="Container" type="javax.sql.DataSource" maxActive="4" maxIdle="2" maxWait="4" username="xxxx" password="xxxx" driverClassName="com.mysql.jdbc.Driver" url="jdbc:mysql://127.0.0.1:3306/?useUnicode=true&amp;amp;characterEncoding=big5"></Resource></Context>

Tomcat v9.0 時, server.xml 不用動, 反而是修改 context.xml
    <Resource 
    name="jdbc/MainDS" 
    auth="Container" 
    type="javax.sql.DataSource" 
    maxTotal="4" 
    maxIdle="2" 
    maxWaitMillis="-1" 
    username="xxxx" 
    password="xxxx" 
    driverClassName="org.mariadb.jdbc.Driver" 
    url="jdbc:mariadb://localhost:3306/?useUnicode=true&amp;characterEncoding=utf8">
    </Resource>
注意其中 maxActive 改成 maxTotal, maxWait 變成 maxWaitMillis
另外 DBCP 也有變化,由
<Resource
    name="jdbc/MainDb"
    scope="Shareable"
    type="javax.sql.DataSource"
    factory="org.apache.tomcat.dbcp.dbcp.BasicDataSourceFactory"
    maxTotal="4" maxIdle="2" maxWaitMillis="-1"
    url="jdbc:mariadb://localhost:3306"
    driverClassName="org.mariadb.jdbc.Driver"
    username="xxxx"
    password="xxxx"
    />
變成
<Resource
    name="jdbc/MainDb"
    scope="Shareable"
    type="javax.sql.DataSource"
    factory="org.apache.tomcat.dbcp.dbcp2.BasicDataSourceFactory"
    maxTotal="4" maxIdle="2" maxWaitMillis="-1"
    url="jdbc:mariadb://localhost:3306"
    driverClassName="org.mariadb.jdbc.Driver"
    username="xxxx"
    password="xxxx"
    />


2018年1月16日 星期二

Point Grey 相機之 FlyCapture 編譯 過程記錄

FlyCapture 有 32 和 64位元兩個版本
32位元安裝在 C:\Program Files (x86)\Point Grey Research\FlyCapture2
64位元安裝在 C:\Program Files\Point Grey Research\FlyCapture2

雖然安裝後有 src, 但因權限的關係,無法直接編譯
另外準備一個目錄 D:\SVN_Repository3\vc\FlyCapture
拷貝 include lib lib64 src_x64 src_x86

build src_x64/Examples_vs2013

雖然是 64位元, 不要改變 Configuration Manager 或 Property Pages 的 Platform 為 x64
雖然可以編譯成功,但是無法執行

VB.Net Examples 的 Project 會產生 Type 'FC2Version' is not defined. 之類的錯誤
開啟 Project 的 Properties 選 References, 可以看到
點選 FlyCapture2Managedd_v120, 在按 Reference Paths
加入目錄 C:\Program Files\Point Grey Research\FlyCapture2\bin64\vs2013
即可解決

CSharp Examples 的 Project 會產生如下的錯誤

開啟 Project 的 Properties 選 Build
改 Output path: bin\Debug\
為 Output path: bin\Debug
即可解決

CSharp Examples 的 Project 還會產生如下的錯誤

開啟 Project 的 Properties 選 Reference Paths 加入目錄
C:\Program Files\Point Grey Research\FlyCapture2\bin64\vs2013\
即可解決

CSharp Examples 的 MultiSyncEx_CSharp_vs2013 Project 還會產生如下的錯誤

點選 MultiSyncEx_CSharp_vs2013/References, 按右鍵選 Add References...
勾選 MultiSyncLibraryManaged_v120.dll 和 FlyCapture2Managed_v120.dll 按 OK
刪除錯誤 References FlyCapture2Managed 和 MultiSyncLibraryManaged
即可解決

C Examples 和 C++ Examples 內的 Project 需要各別 Build
唯一會有錯誤的是 FlyCapture2GUI
修改 FlyCap2CameraControl_ILBridge.h 和 FlyCap2CameraSelection_ILBridge.h
#elif (_MSC_VER == 1800)
#using <..\\..\\bin\\vs2013\\FlyCap2CameraControld_v120.dll>
#using <..\\..\\bin\\vs2013\\FlyCapture2Managedd_v120.dll>
#elif (_MSC_VER == 1700)
#elif (_MSC_VER == 1800)
//#using <..\\..\\bin\\vs2013\\FlyCap2CameraControld_v120.dll>
//#using <..\\..\\bin\\vs2013\\FlyCapture2Managedd_v120.dll>
#using <..\\FlyCap2CameraControl\\bin\\Debug\\FlyCap2CameraControld_v120.dll>
#using <..\\FlyCap2CameraControl\\bin\\Debug\\FlyCapture2Managedd_v120.dll>
#elif (_MSC_VER == 1700)
即可解決

點選 C++ Examples/FlyCap2, 按右鍵選 Set as Startup Project, 嘗試執行, 若產生下列錯誤
是因為 FlyCap2 會用到 FlyCapture2GUI 產生的 FlyCapture2GUId_v120.dll
而 FlyCapture2GUId_v120.dll 會用到 FlyCap2CameraControl 產生的
FlyCap2CameraControld_v120.dll 和 FlyCapture2Managedd_v120.dll
若是刪除 FlyCapture2GUId_v120.dll, 及會使用
C:\Program Files\Point Grey Research\FlyCapture2\bin64\vs2013 目錄下可以執行的程式庫
即可執行,至於什麼原因,就不知道了


2018年1月4日 星期四

使用 MOSFET 產生 PWM 電源

MCU 產生 25kHz PWM
因為 MCU 使用 3.3V, 一些 N通道MOSFET Vgs 甚至要 4V(IRFZ44N)
故用 2N7000(N通道) 推動 IRF5305(P通道)
示波器使用顏色
2N7000 Vg 為黃色
2N7000 Vd 為藍色
IRF5305 Vg 為紫色
IRF5305 Vd(out)為綠色

 一開始的設計R1=10K,並沒有使用R2電阻和223電容,Vd = Vg
加上R2(10K)電阻,因為分壓,使得 IRF5305 Vg 在工作範圍內擺動
加上223電容,加快輸出電壓上升
最後改R1=1K, R2=1K
即可加快輸出電壓的下降
缺最後一張圖


用單節18650產生3.0V

18650 電壓範圍 3.6-4.2V
要產生3.3V, 只有找到 TPS63020, TPS63060, TPS63070

LM1117 要求 Vin - Vout = 1.2V
3.6V - 1.2V = 2.4V

使用 TL431
注意在 750 Ohm, 上有一個較高的電壓(12V)
這裡可不能接 18650
Vout = 2.5 * (1 + 4.7 / 22) = 3.0V
PN2222 的 Vb為 3.0V + 0.7V = 3.7V
Ib = (12 - 3.7) / 750 = 11mA (在TL431 的 Ika 1~100mA 範圍內)
PN2222 的最小 β 為 35
Iout(max) = 11 * 35 = 387mA