網頁

顯示具有 Arduino 標籤的文章。 顯示所有文章

2020年6月24日 星期三

Wii 平衡板 修改(三)Jetson Nano 上的 python

CSR 藍牙接收發射器 4.0

哈啦圈 計數


執行須使用 sudo
$ sudo ~/envs/esp32/bin/python scan.pyscan.py
# execute this by
# (microbit) nano@nano-desktop:~/Data/Esp32/bluepy$ sudo ~/envs/microbit/bin/python scan.py


from bluepy.btle import Scanner, DefaultDelegate

class ScanDelegate(DefaultDelegate):
    def __init__(self):
        DefaultDelegate.__init__(self)

    def handleDiscovery(self, dev, isNewDev, isNewData):
        if isNewDev:
            print("Discovered device {}", dev.addr)
        elif isNewData:
            print("Received new data from {}", dev.addr)

scanner = Scanner().withDelegate(ScanDelegate())
devices = scanner.scan(10.0)

for dev in devices:
    print("Device {} ({}), RSSI={} dB", dev.addr, dev.addrType, dev.rssi)
    for (adtype, desc, value) in dev.getScanData():
        print("  {} = {}", desc, value)


notify.py

Wii 平衡板 修改 (二) Arduino 軟體

Arduino IDE
可能因為使用 Esp32, 導致 Arduino IDE 無法開啟
直到更新版本至 arduino-PR-beta1.9-BUILD-119
主要參考 Library HX711 ,但不能多個 HX711 共用一個 SCK
參考 Library HX711-multi,雖然可以共用 SCK,但不能用 Esp32


HX711.h

Wii 平衡板 修改 (一)

繼續下去,連上 Wii 平衡板
但是為了修護 因電池腐蝕的電源部分
不小心燒掉了 控制電路
所以重新建置所有電路

Wii Balance Board
參考 chaosbiber / wiiweigh
參考 Raspberry Pi Smart Scale
參考 Disassembling Wii Balance Board
參考 Wii Balance Board Smart Scale ( w/ ESP32 )

2020年5月18日 星期一

Arduino MEGA 2560 + RAMPS 1.4 + LCD 12864

X-EN D38 PD7(T0)
X-STEP A0 PF0(ADC0)
X-DIR A1 PF1(ADC1)


Y-EN A2 PF2(ADC2)
Y-STEP A6 PF6(ADC6)
Y-DIR A7 PF7(ADC7)


Z-EN A8 PK0(ADC8/PCINT16)
Z-STEP D46 PL3(OC5A)
Z-DIR D48 PL1(ICP5)


E0-EN D24 PA2(AD2)
E0-STEP D26 PA4(AD4)
E0-DIR D28 PA6(AD6)


RepRapDiscount Full Graphic Smart Controller


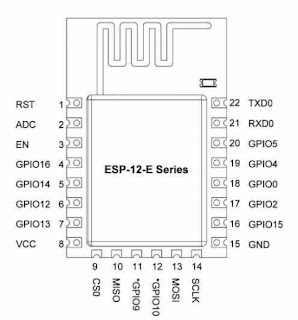
WF8266

WF8266T-TFT
  • GPIO0 : UPDATE(紅色按鍵), DHT11(DATA) / DHT22(DATA)
  • GPIO1 : Tx
  • GPIO2 : None
  • GPIO3 : Rx
  • GPIO4 : SD Card CS
  • GPIO5 : D/C
  • GPIO12: MISO
  • GPIO13: MOSI
  • GPIO14: SCK
  • GPIO15: CS
  • GPIO16: LED
  • ADC : None

常用韌體
  • AT Command
  • Web SDK

Baudrate 115200

WF8266T 更新韌體
1 GPIO0 接地後開機
2 按著紅色鍵(UPDATE),再按白色(RESET)鍵一次後,放開紅色鍵

BUILTIN_LED GPIO2

WF8266R 更新韌體
1 按著白色鍵 5 秒 藍色LED慢閃 重新開機
2 接腳 RST 接地 重新開機
3 白色鍵按著 並且 重新開機 進入燒寫模式
4 按著白色鍵 10 秒 藍色 LED 快閃 重置

BUILTIN_LED GPIO12

AT Command
Baudrate 115200
選擇 NL&CR

AT+CIFSR: 顯示 IP 和 MAC
AT+CIPSTA=<IP>: 設定 IP,IP 要加引號

AT+CWMODE?: 查詢當前模式
AT+CWMODE=1: 設定為 Station 模式
AT+CWMODE=2: 設定為 AP 模式
AT+CWMODE=3: 設定為 Station+AP 模式

AT+CWLAP: 查詢可連線的Wifi網路清單,需在 Station 模式
AT+CWJAP?: 查詢目前連線的網路
AT+CWJAP=<SSID>,<Password>: 連線到網路,SSID 與 Password 要加引號
AT+CWQAP: 切斷連線

AT+CIPMUX=0: 關閉多重連線,此時無法進入伺服器模式
AT+CIPMUX=1: 開啟多重連線模式
AT+CIPMUX?: 查詢目前模式

AT+CIPSERVER=<mode>,<port>: 開啟或關閉伺服器
mode: 0關閉,1開啟

AT+CIPSTART=?: 查詢目前已經建立的連線
AT+CIPSTART=<type>,<addr>,<port>: 連線網路,適用於 CIPMUX=0
AT+CIPSTART=<id>,<type>,<addr>,<port>: 連線網路,適用於 CIPMUX=1
id: 0-4
type: "TCP" or "UDP"
addr: IP 位址,要加引號

AT+CIPSEND=<length>: 傳送訊息,適用於 CIPMUX=0
AT+CIPSEND=<id>,<length> 傳送訊息,適用於 CIPMUX=1
length: 訊息長度。此命令發送後,等 > 符號出現,再輸入訊息

AT+CIPCLOSE: 中斷連線,適用於 CIPMUX=0
AT+CIPCLOSE=<id>: 中斷連線,適用於 CIPMUX=1

Web SDK
  1. 第一次使用 WF8266R 會進入 AP 模式
  2. 利用電腦查詢可用無線網路,會看到 UNU-WF8266R-xxxx 的 AP
  3. 設定使用自動取得 IP,連入上述網路,預設沒有密碼
  4. 使用瀏覽器連入 http://192.168.4.1
  5. 填入 WF8266R 要使用哪一台 AP 上網
  6. 此時 WF8266R 會重開機,並且連入上述網路
  7. 再次利用瀏覽器連入 http://192.168.4.1
  8. 此時可以看到 WF8266R 的設定,包含 IP如 192.168.1.20
  9. 重新設定電腦連線,與 WF8266R 同一 AP
  10. 再次利用瀏覽器連入 http://192.168.1.20
http://192.168.1.20/ap/on 打開 AP
http://192.168.1.20/ap/off 關閉 AP


測試 SD Card 速度

釋放Linux記憶體
# echo 1 > /proc/sys/vm/drop_caches
釋放dentries、inodes所用的 cache memory。
# echo 2 > /proc/sys/vm/drop_caches
釋放pagecache、dentry、inode 所用的 cache memory。
# echo 3 > /proc/sys/vm/drop_caches
完全釋放cache memory,必須先執行sync,避免錯誤。
# sync

Write speed
# sync; time dd if=/dev/zero of=~/test.tmp bs=500K count=1024
Read speed
# sync; echo 3 | sudo tee /proc/sys/vm/drop_caches
# sync; time dd if=~/test.tmp of=/dev/null bs=500K count=1024

SanDisk microSDHC 32GB Extreme U3 90MB/s
Arduino 寫速度測試
root@arduino:/mnt/sda1# sync; time dd if=/dev/zero of=test.tmp bs=500K count=1024
1024+0 records in
1024+0 records out
real    2m 25.16s
user    0m 0.04s
sys     0m 20.11s
Arduino 讀速度測試
root@arduino:/mnt/sda1# sync; echo 3|tee /proc/sys/vm/drop_caches
3
root@arduino:/mnt/sda1# sync; time dd if=test.tmp of=/dev/null bs=500k count=1024
1024+0 records in
1024+0 records out
real    0m 30.68s
user    0m 0.00s
sys     0m 8.86s
root@arduino:/mnt/sda1# uname -a
Linux arduino 3.3.8 #1 Thu Jun 2 12:28:33 CEST 2016 mips GNU/Linux
root@arduino:/mnt/sda1#
Arduino 拍照測試(不下載)
root@arduino:/# time gphoto2 --port usb:001,003 --capture-image
New file is in location /capt0000.jpg on the camera
real    0m 4.92s
user    0m 1.74s
sys     0m 0.36s
Arduino 拍照測試,下載到 Flash
root@arduino:/# time gphoto2 --port usb:001,003 --capture-image-and-download --no-keep
New file is in location /capt0000.jpg on the camera
Saving file as capt0000.jpg
Deleting file /capt0000.jpg on the camera
Deleting 'capt0000.jpg' from folder '/'...
real    0m 22.88s
user    0m 1.23s
sys     0m 8.77s
root@arduino:/#
Arduino 拍照測試,下載到 SD Card
root@arduino:/mnt/sda1# time gphoto2 --port usb:001,003 --capture-image-and-down
load --no-keep
New file is in location /capt0000.jpg on the camera
Saving file as capt0000.jpg
Deleting file /capt0000.jpg on the camera
Deleting 'capt0000.jpg' from folder '/'...
real    0m 6.53s
user    0m 1.81s
sys     0m 0.58s
root@arduino:/mnt/sda1#
RaspberryPi 寫速度測試
pi@raspberrypi:~ $ sync; echo 3| sudo tee /proc/sys/vm/drop_caches
3
pi@raspberrypi:~ $ sync; time dd if=/dev/zero of=test.tmp bs=500k count=1024
1024+0 records in
1024+0 records out
524288000 bytes (524 MB) copied, 27.8328 s, 18.8 MB/s

real 0m27.847s
user 0m0.020s
sys 0m3.360s
RaspberryPi 讀速度測試
pi@raspberrypi:~ $ sync; echo 3| sudo tee /proc/sys/vm/drop_caches
3
pi@raspberrypi:~ $ sync; time dd if=test.tmp of=/dev/null bs=500k count=1024
1024+0 records in
1024+0 records out
524288000 bytes (524 MB) copied, 22.8695 s, 22.9 MB/s

real 0m22.877s
user 0m0.050s
sys 0m1.340s
pi@raspberrypi:~ $ 
RaspberryPi 拍照測試(不下載)
pi@raspberrypi:~ $ time gphoto2 --port usb:001,004 --capture-image
New file is in location /capt0000.jpg on the camera                            

real 0m3.011s
user 0m0.150s
sys 0m0.100s
RaspberryPi 拍照測試(下載)
pi@raspberrypi:~ $ time gphoto2 --port usb:001,004 --capture-image-and-download --no-keep
New file is in location /capt0000.jpg on the camera                            
Saving file as capt0000.jpg
Deleting file /capt0000.jpg on the camera
Deleting 'capt0000.jpg' from folder '/'...

real 0m3.037s
user 0m0.140s
sys 0m0.140s
pi@raspberrypi:~ $ 


SanDisk ExtremePRO microSDHC UHS-I(V30) 32GB
Arduino 寫速度測試
root@arduino:/mnt/sda1# sync; time dd if=/dev/zero of=test.tmp bs=500K count=1024
1024+0 records in
1024+0 records out
real    2m 32.46s
user    0m 0.01s
sys     0m 20.18s
Arduino 讀速度測試
root@arduino:/mnt/sda1# sync; echo 3|tee /proc/sys/vm/drop_caches
3
root@arduino:/mnt/sda1# sync; time dd if=test.tmp of=/dev/null bs=500k count=1024
1024+0 records in
1024+0 records out
real    0m 30.80s
user    0m 0.00s
sys     0m 8.52s
root@arduino:/mnt/sda1#
Arduino 拍照測試(不下載)
root@arduino:/# time gphoto2 --port usb:001,003 --capture-image
New file is in location /capt0000.jpg on the camera
real    0m 4.92s
user    0m 1.74s
sys     0m 0.45s
Arduino 拍照測試,下載到 Flash
root@arduino:/# time gphoto2 --port usb:001,003 --capture-image-and-download --no-keep
New file is in location /capt0000.jpg on the camera
Saving file as capt0000.jpg
Deleting file /capt0000.jpg on the camera
Deleting 'capt0000.jpg' from folder '/'...
real    0m 22.96s
user    0m 1.19s
sys     0m 9.09s
root@arduino:/#
Arduino 拍照測試,下載到 SD Card
root@arduino:/mnt/sda1# time gphoto2 --port usb:001,003 --capture-image-and-download --no-keep
New file is in location /capt0000.jpg on the camera
Saving file as capt0000.jpg
Deleting file /capt0000.jpg on the camera
Deleting 'capt0000.jpg' from folder '/'...
real    0m 5.89s
user    0m 1.80s
sys     0m 0.45s
root@arduino:/mnt/sda1#


RaspberryPi 寫速度測試
pi@raspberrypi:~ $ sync; echo 3| sudo tee /proc/sys/vm/drop_caches
3
pi@raspberrypi:~ $ sync; time dd if=/dev/zero of=test.tmp bs=500k count=1024
1024+0 records in
1024+0 records out
524288000 bytes (524 MB) copied, 27.6452 s, 19.0 MB/s

real 0m27.657s
user 0m0.000s
sys 0m4.020s
RaspberryPi 讀速度測試
pi@raspberrypi:~ $ sync; echo 3| sudo tee /proc/sys/vm/drop_caches
3
pi@raspberrypi:~ $ sync; time dd if=test.tmp of=/dev/null bs=500k count=1024
1024+0 records in
1024+0 records out
524288000 bytes (524 MB) copied, 23.0098 s, 22.8 MB/s

real 0m23.020s
user 0m0.000s
sys 0m1.610s
pi@raspberrypi:~ $ 
RaspberryPi 拍照測試(不下載)
pi@raspberrypi:~ $ time gphoto2 --port usb:001,004 --capture-image
New file is in location /capt0000.jpg on the camera                          

real 0m3.053s
user 0m0.160s
sys 0m0.140s
RaspberryPi 拍照測試(下載)
pi@raspberrypi:~ $ time gphoto2 --port usb:001,004 --capture-image-and-download --no-keep
New file is in location /capt0000.jpg on the camera                          
Saving file as capt0000.jpg
Deleting file /capt0000.jpg on the camera
Deleting 'capt0000.jpg' from folder '/'...

real 0m2.994s
user 0m0.170s
sys 0m0.070s
pi@raspberrypi:~ $ 

2017年3月29日 星期三

Arduino 增加 printf

參考 http://playground.arduino.cc/Main/Printf
開啟 Print.h, 加入下列程式

#include <stdarg.h>

#define PRINTF_BUF 80 // define the tmp buffer size (change if desired)

    void printf(const char *format, ...)
    {
        char buf[PRINTF_BUF];
        va_list ap;
        va_start(ap, format);
        vsnprintf(buf, sizeof(buf), format, ap);
        for(char *p = &buf[0]; *p; p++) // emulate cooked mode for newlines
        {
            if(*p == '\n')
                write('\r');
            write(*p);
        }
        va_end(ap);
    }
#ifdef F // check to see if F() macro is available
    void printf(const __FlashStringHelper *format, ...)
    {
        char buf[PRINTF_BUF];
        va_list ap;
        va_start(ap, format);
#ifdef __AVR__
        vsnprintf_P(buf, sizeof(buf), (const char *)format, ap); // progmem for AVR
#else
        vsnprintf(buf, sizeof(buf), (const char *)format, ap); // for the rest of the world
#endif
        for(char *p = &buf[0]; *p; p++) // emulate cooked mode for newlines
        {
            if(*p == '\n')
                write('\r');
            write(*p);
        }
        va_end(ap);
   }
#endif

2017年3月10日 星期五

Arduino Yun

Yún Shield 不是 Yún
Yún Shield 是用來擴充 Arduino Leonardo 成為 Yún 的

Yún 有三個 Reset 按鈕
網路邊: 32U4 RST
USB邊: WLAN, 作用有兩種
  1. 按5秒,wifi 回AP模式 SSID=Arduino-Yun-XXXXXXXXXXXX, IP=192.168.240.1
      命令: wifi-reset-and-reboot
  2. 按30秒,linux 環境回復出廠值,清除板上的 Flash 記憶體
      命令: reset-to-factory-anyway
另一角: YUN RST

預設的密碼不是 arduino 就是 doghunter

WiFi: Linino-xxxxxxxxxxxx
IP: 192.168.240.1
PASSWORD: doghunter

opkg install xxxx.ipk
opkg remove xxxx
opkg remove xxxx --force-remove
opkg list-installed


編輯 /lib/functions.sh 加入
default_postinst() {
  return 0
}
default_prerm() {
  return 0
}

透過網路連到 colsole
root@arduino:~# telnet localhost 6571

使用 SD卡 擴充 Arduino Yun 的儲存空間

參考 Auto-Expanding of your File System using Pivot Overlay

df -h
查詢 Filesystem 使用狀態

插入 SD卡 會顯示在 /mnt/sda1

執行 overlay-only -i 命令, 第一次執行會要求安裝 Fdisk
在執行一次 overlay-only -i 命令, 會顯示下列選項
1. Pivot Overlay on SDCard (Experimental)
2. Revert Pivot Overlay on SDCard (Experimental)
3. Format SDCard
4. Exit and reboot
0. Exit

若沒有安裝 overlay-only, 使用下列命令
wget https://raw.githubusercontent.com/linino/linino_distro/lininoIO/package/linino/yun-scripts/files/usr/bin/overlay-only
chmod +x overlay-only
mv overlay-only /usr/bin

注意:若是你已經擴充了你的檔案系統,並且你想要更新 Arduino Yun 板,執行下列步驟
- uninstall all programs;
- execute the Revert Pivot Overlay;

Arduino Yun Graphoto2 2.5.2

cd /tmp
wget http://www.ibuyopenwrt.com/images/gphoto2_2.5.2-1_ar71xx.ipk
wget http://www.ibuyopenwrt.com/images/libgphoto2-drivers_2.5.2-1_ar71xx.ipk
wget http://www.ibuyopenwrt.com/images/libgphoto2_2.5.2-1_ar71xx.ipk
opkg update
opkg install libgphoto2_2.5.2-1_ar71xx.ipk
opkg install gphoto2_2.5.2-1_ar71xx.ipk
opkg install libgphoto2-drivers_2.5.2-1_ar71xx.ipk

參考網站 Arduino Yun Gphoto2 2.5.2

2017年1月11日 星期三

Arudino Yun 之 OS

Arduino 分裂成 org 和 cc
org 的 Arduino Yun 使用 LininoIO
cc 的 Arduino Yun 使用 OpenWrt
兩者個關係,實在是搞不清楚

電腦開啟 TFTPUtil GUI, 按下 Options
輸入 Path 和 Server IP Address 後按 OK
按 Start TFTP Server

透過 micro USB 連接到電腦
電腦開啟 Arduino IDE
Tools/Board/Arduino Yun
Tools/Port
File/Examples/Bridge/YunSerialTerminal
按 Upload 傳至 Arduino Yun
電腦開啟 Tera Term, 透過 Serial Port連至 Arduino Yun
若發現是一堆亂碼,修改 YunSerialTerminal 的 linuxBaud 為 115200

壓 Arduino Yun 上的 YUN RST(靠 LED 的按鈕)
並且快速透過 Tera Term(Serial Port) 按下 Enter 鍵,進入 U-Boot

以下使用 org 的 LininoIO
等出現 autoboot in 4 seconds (stop with 'lin'), 輸入 lin
此時會出現
linino>
連接 Arduino Yun 的網路(不能使用 wifi)
setenv serverip 192.168.1.70
setenv ipaddr 192.168.1.72
printenv
tftp 0x80060000 u-boot-linino-yun.bin;
請確認正確下載,若有問題請檢查網路設定
erase 0x9f000000 +0x40000;
cp.b $fileaddr 0x9f000000 $filesize;
tftp 0x80060000 lininoIO-generic-linino-yun-kernel.bin
erase 0x9fEa0000 +0x140000;
cp.b $fileaddr 0x9fea0000 $filesize;
tftp 0x80060000 lininoIO-generic-linino-yun-rootfs-squashfs.bin
erase 0x9f050000 +0xE50000;
cp.b $fileaddr 0x9f050000 $filesize;
erase 0x9f040000 +0x10000;
reset
setenv console ttyATH0,250000
saveenv
reset
透過 SSH 連上 ArduinoYun, 執行 lininoio -f stop
設定 ttyATH0 為 console

以下使用 cc 的 OpenWrt
等出現 autoboot in 4 seconds (type 'ard' to enter u-boot console), 輸入 ard
此時會出現
ar7240>
setenv serverip 192.168.1.70
setenv ipaddr 192.168.1.72
ping 192.168.1.70
tftp 0x80060000 openwrt-ar71xx-generic-linino-u-boot.bin
erase 0x9f000000 +0x40000
cp.b $fileaddr 0x9f000000 $filesize
erase 0x9f040000 +0x10000
tftp 0x80060000 openwrt-ar71xx-generic-yun-16M-kernel.bin
erase 0x9fEa0000 +0x140000
cp.b $fileaddr 0x9fea0000 $filesize
tftp 0x80060000 openwrt-ar71xx-generic-yun-16M-rootfs-squashfs.bin
erase 0x9f050000 +0xE50000
cp.b $fileaddr 0x9f050000 $filesize
bootm 0x9fea0000

org 的 LininoIO 參考資料
LininoIO OS upgrade from U-boot
Upgrade to Linino
Server at download.linino.org

使用網頁更新作業系統
下載最新的影像檔 Index of /linino_distro/lininoIO/latest
檔名有 mini 的是給 YunShield 用的,不要下載
連上 ArduinoYun 網頁
左上角 Applications/Arduino/Arduino Luci
輸入帳號密碼
System/"Backup/Flash Firmware"
點選 Flash new firmware image 的 "選擇檔案",選擇剛下載的影像檔

使用命令列更新作業系統
使用 ssh 連入系統
cd /tmp
wget http://download.linino.org/linino_distro/lininoIO/latest/lininoIO-generic-linino-yun-squashfs-sysupgrade.bin
sysupgrade -v -n lininoIO-generic-linino-yun-squashfs-sysupgrade.bin

使用網頁更新作業系統
下載最新的影像檔,並且解壓縮
連上 ArduinoYun 網頁,並登入
點 CONFIGURE
點 advanced configuration panel (luci)
System/"Backup/Flash Firmware"
點選 Flash new firmware image 的 "選擇檔案",選擇剛下載的影像檔

使用命令列更新作業系統
使用 ssh 連入系統,不能使用 YunSerialTerminal
run-sysupgrade /mnt/sda1/openwrt-ar71xx-generic-yun-squashfs-sysupgrade.bin